
Have you ever found yourself in the middle of a print, only to realize you're running low on filament? Or maybe you just want to add a second color to a model to make it pop.
You're not alone. Changing filament mid-print is a practical skill every 3D printing enthusiast should know. It serves two main purposes: saving a print when you run out of material, and allowing you to create multi-colored objects with a single extruder.
In this guide, we will walk through the specific steps to handle this process smoothly.
Can You Change Filament During the 3D Printing Process?
Yes. Changing filament mid-print is a common practice. This allows for altering colors, materials, or replacing an empty spool without canceling the entire job.
However, to avoid layer shifts or blobs, you need to follow a specific sequence. Whether you are using a standard screen-based printer or a button-controlled model like the AnkerMake M5C, the logic is the same.
Step by Step Guide to Change the Filaments
Here's a step-by-step guide to changing filaments during a 3D print:
Step 1: Pause the Print
Initiating the filament change begins with a pause. You can do this manually on the screen, but we recommend planning it in your slicer software (like eufyMake Studio) for better precision.
First, import your model into the slicer. Decide where you want the color change to happen by dragging the vertical slider on the right to the exact layer. After that, click the small plus button (+) next to the slider to add a pause command.
When your printer reaches that layer, it will automatically pause and park the nozzle. If you are just fixing a run-out emergency, simply tapping "Pause" on the printer screen works too.
Step 2: Retract the Filament
Once the printer is paused, you need to remove the material. Click the "Extrude" button briefly to melt the tip, then click the "Retract" button on your screen. This prevents the filament from getting stuck inside the hotend.
Retracting properly helps avoid clogging, ensuring the old filament comes out cleanly.
Step 3: Remove the Old Filament
Next, press the release lever on top of the extruder and gently pull the old filament out. Be gentle to avoid damaging the feeder mechanism.

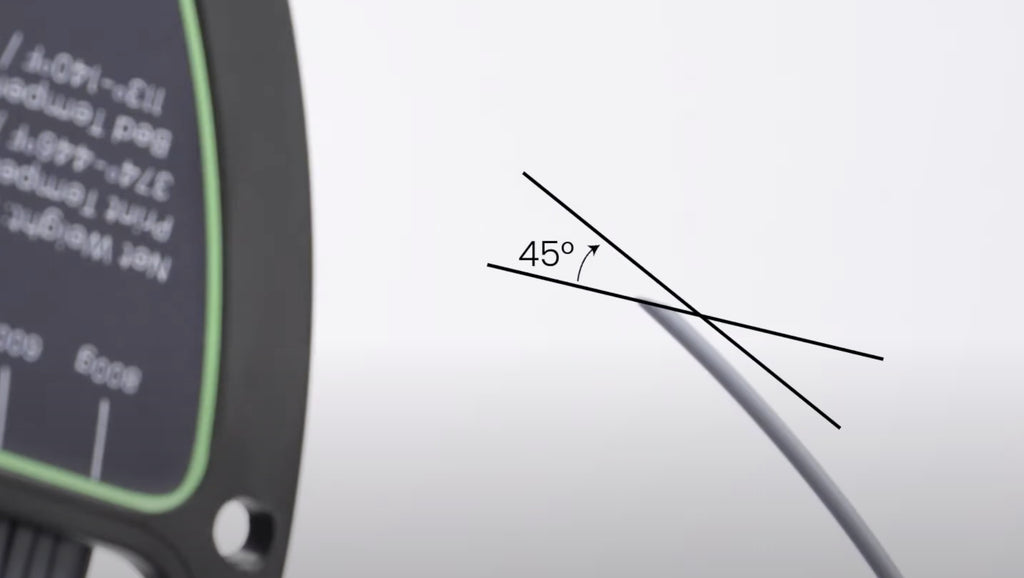
Step 4: Load the New Filament
Now, insert the new spool. This could be a different color or a fresh spool of the same material.
Tip: Cut the filament tip at a 45° angle—this makes it easier to slide into the gears. Insert the new filament into the inlet and push it in while holding the lever until you feel the gears grab it.
Step 5: Purge the Old Color
To stop the colors from mixing, you need to purge the nozzle.
Click Extrude on the interface and watch the nozzle. Once the extruded filament runs clean with the pure new color, remove the waste material with tweezers. This ensures your next layer starts with the correct color.
Step 6: Resume the Print
Now you are ready to continue. On most 3D printers, you simply need to tap the "Resume" button on the control screen.
For example, if you are using an AnkerMake M5, just tap "Resume" on the touch screen. For AnkerMake M5C users (who don't have a screen), simply click the Play/Pause button on the printer base once.
The printer will return to the exact coordinates and continue printing the next layer.
Tips for Changing Filaments During the Print
Changing filament mid-print is a crucial skill. Here are a few tips to help you master it:

1. Compatibility Check: Before making any changes, confirm that the new 3D printer filaments are compatible. It is safest to stick to the same material (e.g., PLA to PLA).
2. Preparation: To reduce downtime, have the new filament ready before you pause. If the bed cools down too much, the print might detach.
3. Temperature Considerations: Different materials require different temperatures. If you switch from PLA (190°C) to ABS (240°C), remember to adjust the nozzle temp manually.
4. Clean Transition: Always extrude enough material during the swap. You don't want muddy colors ruining your model.
5. Firm Installation: Make sure the gears have grabbed the new strand firmly. A loose installation can cause extrusion errors.
6. Test Extrusion: Always conduct a brief test extrusion before hitting resume. This confirms the new filament is flowing correctly and the printer is ready to go.
Final Thoughts
Mastering the mid-print filament change is a simple way to get more out of your 3D printer. Being able to fix a run-out spool or add a splash of color makes your printing process much more flexible.
If you feel that pausing and changing filament is too much work, you might want to try the latest UV printing technology. It allows you to color your models quickly and easily, without the hassle.
Give it a try on your next project!
FAQs
What to Do When Filament Runs Out Mid Print?
If you run out of filament during printing, simply pause the print, replace the spool, and resume. Most modern printers like the AnkerMake M5 have a filament runout sensor that handles this automatically.
Can I Change Filament Mid-Print with Different Types of Filaments, Such As PLA to ABS?
Technically yes, but it is risky. ABS requires a much hotter bed and enclosure than PLA. It is safer to stick to different colors of the same material type.
How Do I Ensure a Smooth Transition between Filaments?
Always extrude the new filament until the old color is completely flushed out before hitting resume. Also, try to complete the swap quickly so the print bed stays hot.


